Test reporters
- Version:
- See buster-test
- Module:
require("buster-test").reporters;- In browsers:
buster.reporters;
Reporters listen to test runner events and visualize progress and results of test runs. Buster ships with several alternatives, and it is easy to make your own.
dots reporter
Prints a single character for each test as the tests are running. When the test run completes, it prints a list of errors and a summary. The characters printed while running are:
.:- Test passed (green)
F:- Test failed (red)
E:- Uncaught error (yellow)
A:- Asynchronous test (purple)
T:- Timeout (red)
The A indicating an asynchronous test is replaced by one of the others when
the test completes, or a T if it times out (using ANSI escape characters).
In order to help you find the source of errors faster, the reporter filters the stack trace using buster.stackFilter.
-
dotsReporter.create()¶ var reporter = dotsReporter.create(options)l
Create an instance. For options, see Console reporter options.
-
dotsReporter.listen()¶ reporter.listen(testRunner);
Bind the reporter to a test runner.
Example:
var testRunner = require("buster-test").testRunner;
var dotsReporter = require("buster-test").reporters.dots;

var reporter = dotsReporter.create({ color: false });
var runner = testRunner.create();
reporter.listen(runner);

runner.runSuite(...);
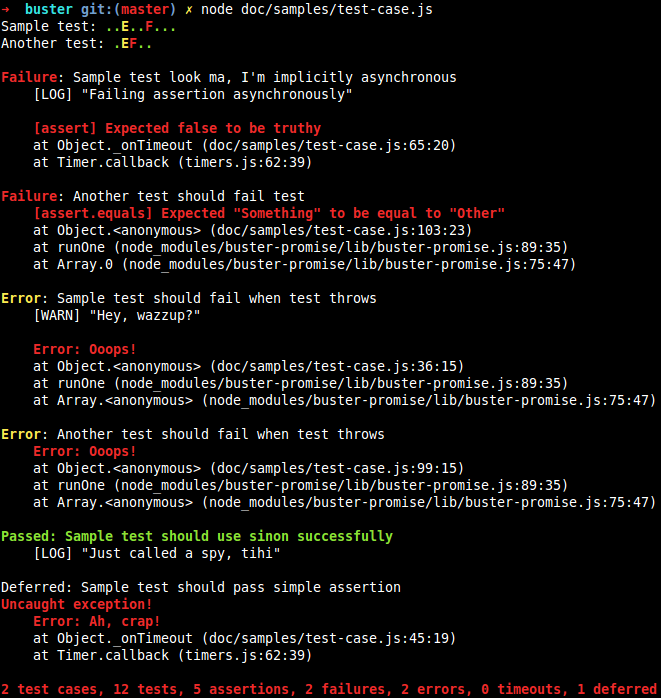
Sample output
specification reporter
Reporter inspired by those found in vows.js, nodeunit, and others. The reporter gives you all information it has as soon as it can. With longer-running test cases, this reporter will give you the meat of your errors faster.
In order to help you find the source of errors faster, the reporter filters the stack trace using buster.stackFilter.
-
specificationReporter.create()¶ var reporter = specificationReporter.create(options);
Create an instance. For options, see Console reporter options.
-
specificationReporter.listen()¶ reporter.listen(testRunner);
Bind the reporter to a test runner.
Example:
var testRunner = require("buster-test").testRunner;
var specificationReporter = require("buster-test").reporters.specification;

var reporter = specificationReporter.create({ color: false });
var runner = testRunner.create();
reporter.listen(runner);

runner.runSuite(...);
Sample output

quiet reporter
The quiet reporter simply prints the ending stats only.
-
quietReporter.create()¶ var reporter = quietReporter.create(options);
Create an instance. For options, see Console reporter options.
-
quietReporter.listen()¶ reporter.listen(testRunner);
Bind the reporter to a test runner.
Example:
var testRunner = require("buster-test").testRunner;
var quietReporter = require("buster-test").reporters.quiet;

var reporter = quietReporter.create({ color: false });
var runner = testRunner.create();
reporter.listen(runner);

runner.runSuite(...);
Sample output

xml reporter
Generates JUnit/Ant compatible XML output for use in continuous integration servers. The reporter prints XML to stdout, so you have to pipe it to a file manually if needed. The XML output is compatible with CI servers such as Jenkins (formerly Hudson).
-
xmlReporter.create()¶ var reporter = xmlReporter.create(options);
Create an instance. For options, see Console reporter options.
-
xmlReporter.listen()¶ reporter.listen(testRunner);
Bind the reporter to a test runner.
Example:
var testRunner = require("buster-test").testRunner;
var xmlReporter = require("buster-test").reporters.xml;

var reporter = xmlReporter.create({ color: false });
var runner = testRunner.create();
reporter.listen(runner);

runner.runSuite(...);
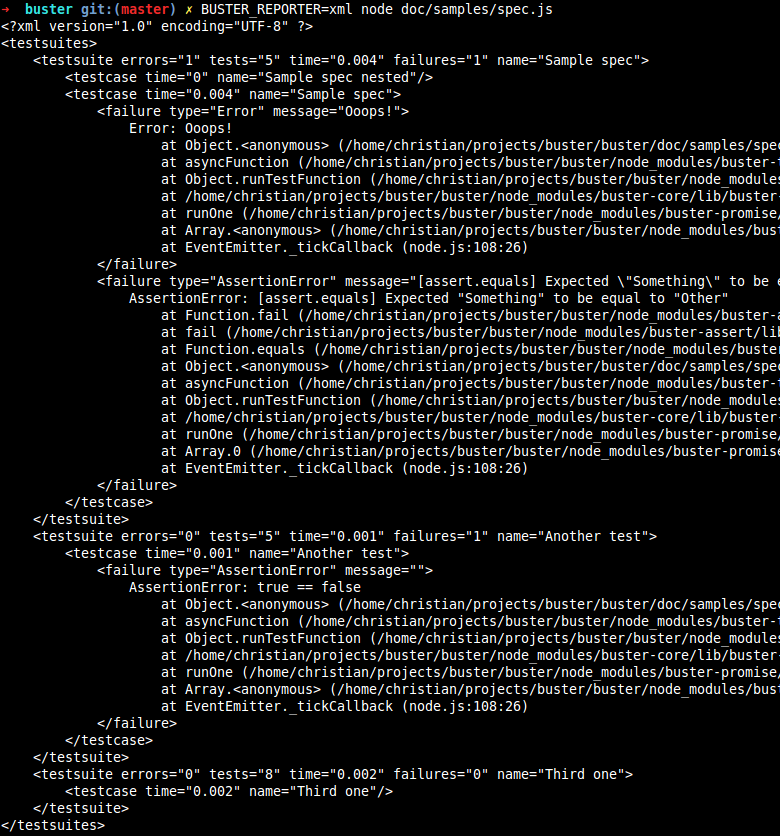
Sample output
html reporter
The reporter mimics the specification reporter. It can use an entire web
page to render a nice test report, or embed itself as a console, making it
useful for in-app integration testing. You can also use it on the command line
to generate an HTML report of your test run.
In order to help you find the source of errors faster, the reporter filters the stack trace using buster.stackFilter.
-
htmlReporter.create()¶ var reporter = htmlReporter.create(htmlOptions);
Create an instance. For options, see HTML reporter options.
-
htmlReporter.listen()¶ reporter.listen(testRunner);
Bind the reporter to a test runner.
Example:
var reporter = buster.reporters.html.create({
    root: document.body // Full webpage mode
});

var runner = buster.testRunner.create();
reporter.listen(runner);

runner.runSuite(...);
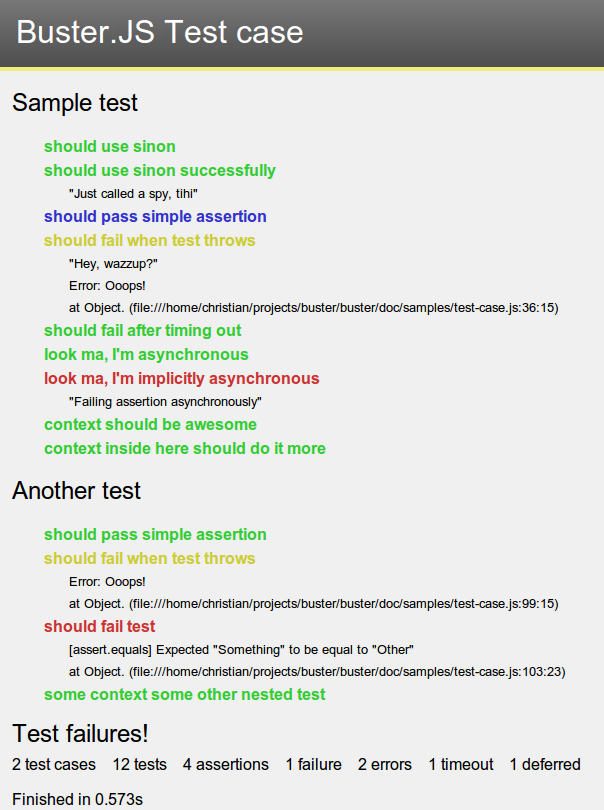
Sample output
jsonProxy reporter
Not intended for human consumption. The jsonProxy reporter proxies all events from the Test runner, but strips any non-JSON safe value (such as functions). Buster uses this when emitting test results from a browser to the server.
-
jsonProxyReporter.create()¶ var reporter = jsonProxyReporter.create(emitter);
Create an instance. You can optionally provide an event emitter to emit events with. Buster uses this option to provide a messaging client that will emit events directly over the wire.
-
jsonProxyReporter.listen()¶ reporter.listen(testRunner);
Bind the reporter to a test runner.
The jsonProxy reporter is to be used in place of the test runner when using a reporter that needs pure JSON-friendly objects. The example below uses the XML reporter - it works fine directly with the test runner as well, it is only used to illustrate how jsonProxy works:
var proxy = buster.reporters.jsonProxy.create();
var runner = buster.testRunner.create();
proxy.listen(runner);

var reporter = buster.reporters.xml.create();
reporter.listen(proxy);
Implementing a reporter
Buster reporters consume events from a buster.testRunner instance and should conform to the simple API described below. For the reporter to be usable with Buster’s auto-wiring mechanism, you also need to make the reporter available as a Node module. The auto-wiring mechanism is what is in use when you have not instantiated a runner on your own and you do this:
BUSTER_REPORTER=myReporter node mytest.js
(Or use buster test -r myReporter)
Include the reporter in
buster.reportersIn browsers, you must expose the reporter in the correct object:
buster.reporters.myReporter = { /*...*/ };
Implement
create(options)This method should return a new instance. It will be passed an
optionsobject.Implement
listen(testRunner)This method allows you to listen to events of interest on the test runner. The built-in reporters typically use
buster.bind(), but you are completely free to implement this the way you feel best. See Events for available events.Include your reporter on the load path
In browsers, this means add a script tag loading your reporter after loading Buster and before loading your tests. On node, you must make the reporter available to Buster. This is usually accomplished by coding the reporter as a Node module and doing
npm linkin the reporter project.Run it:
BUSTER_REPORTER=myReporter node mytest.js
Example
The following example shows how to implement a reporter that prints test contexts and test names as a nested tree.
Create a directory for our reporter:
mkdir /tmp/spec-tree
cd /tmp/spec-tree
First, let’s just create a blank reporter and a sample project to test it with. We’ll have the reporter print something so we can verify that it works.
// /tmp/spec-tree/index.js
module.exports = {
    create: function (options) {
        return Object.create(this);
    },

    listen: function (runner) {
        runner.on("test:start", function (test) {
            console.log("Test started");
        });
    }
};
Console reporter options
Options when creating console reporters. All properties are optional.
color:- When
true, print report in colors. Default istrue. bright:- When
true, print report in bright colors (requirescolor: true). Default istrue. cwd:- The current working directory. Passed to buster.stackFilter.
io:- The stream to print to. The default value is to use the
sysmodule. Theioobject is required to implement two methods:print, which prints a string andputs, which prints a string and a line-break.
Default values
{
    color: true,
    bright: true,
    cwd: null,
    io: require("sys")
}
HTML reporter options
Options when creating HTML reporters.
root:- The root element to render test results in. Required.